 Save
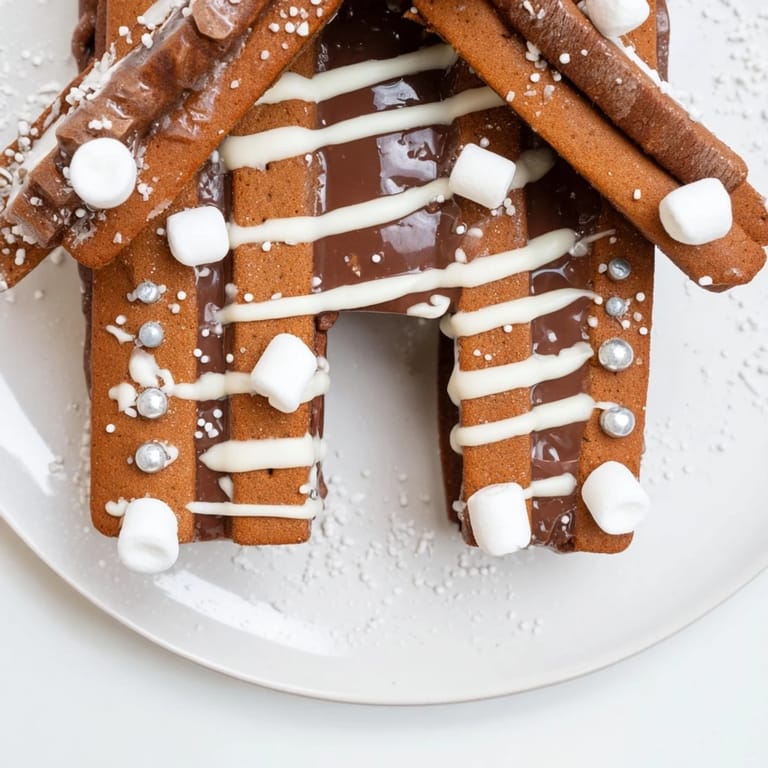
Save I still remember the December afternoon when my grandmother pulled a gingerbread house frame from her oven, and the kitchen filled with that intoxicating blend of ginger, cinnamon, and molasses. She'd been making these for decades, and watching her transform flat, spiced dough into an edible architectural marvel felt like witnessing kitchen magic. That day, I learned that a gingerbread house isn't just decoration—it's an invitation to gather, to celebrate, and to taste nostalgia in every crumbly, spiced bite. Now, whenever I make this frame, I'm transported back to that warm kitchen, and I want to share that same feeling with everyone who builds one.
Last year, I assembled this gingerbread frame with my niece on Christmas Eve, her small hands carefully pressing candies into the softened icing while I piped white chocolate details. We laughed when a piece cracked, problem-solved with extra icing, and by the time we'd finished, she looked at me and said, 'This is the most delicious art project ever.' That moment crystallized why I make this every year—it's the hands working together, the gentle guidance, and the pride of creating something beautiful enough to display and tasty enough to devour.
Ingredients
- All-purpose flour (300 g): The foundation of structure; measure by spooning and leveling to avoid a heavy dough that resists rolling
- Brown sugar (100 g): Adds moisture and deep molasses notes; pack it lightly into your measuring cup
- Unsalted butter, softened (100 g): Must be at room temperature so it creams smoothly with the sugar, creating air pockets for tender gingerbread
- Molasses or dark honey (100 g): This is your flavor anchor—use real molasses for authentic spice-cake depth, or substitute honey for a lighter taste
- Large egg (1): Binds everything and adds richness; bring to room temperature before mixing
- Ground ginger (1 tsp): The star spice; freshly ground from whole pieces is superior, but quality ground ginger works beautifully
- Ground cinnamon (1 tsp): Warm and comforting; this is where much of the holiday magic lives
- Ground cloves (½ tsp): A pinch of mystery and sophistication; don't skip it, but don't overdo it or it becomes medicinal
- Baking soda (½ tsp): Leavens the dough slightly and deepens the brown color during baking
- Salt (¼ tsp): Amplifies all the spices and balances sweetness
- Egg white (1): For royal icing; use room temperature for best volume when beating
- Powdered sugar, sifted (200 g): Must be sifted to avoid lumps that would ruin smooth icing; this is non-negotiable
- Lemon juice (½ tsp): Brightens the icing and prevents it from tasting too sweet
- White chocolate, melted (50 g): Creates delicate drizzles for decoration; melt gently over warm water, never direct heat
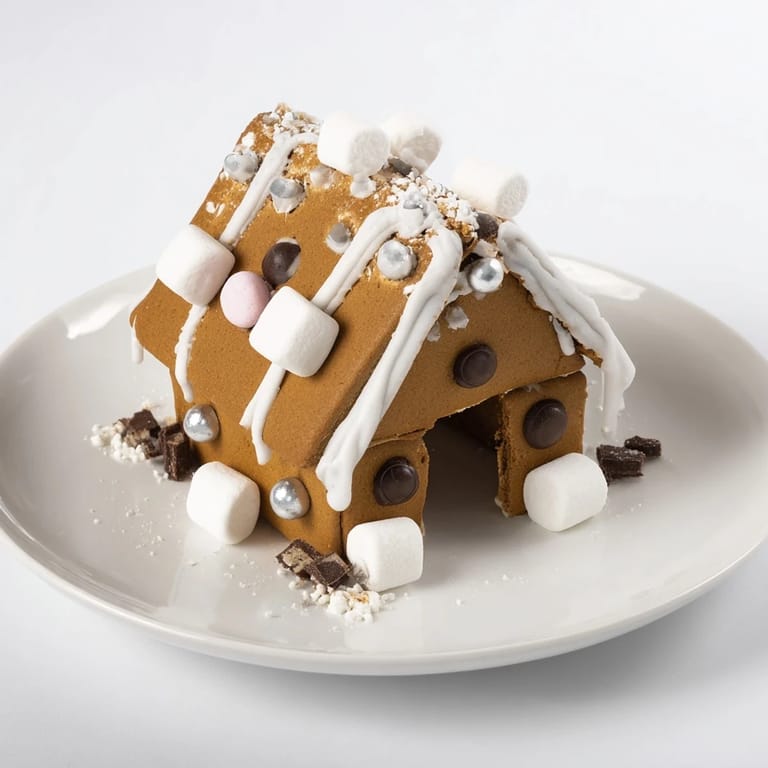
- Assorted candies: Chocolate buttons, white sprinkles, and mini marshmallows are classics, but let your holiday spirit guide your choices
- Edible glitter or silver pearls (optional): These catch light beautifully and add final festive sparkle
Tired of Takeout? 🥡
Get 10 meals you can make faster than delivery arrives. Seriously.
One email. No spam. Unsubscribe anytime.
Instructions
- Prepare your dough base:
- Cream the softened butter and brown sugar together in a large bowl. You'll know it's ready when it's pale and fluffy, like soft clouds—this takes about 2-3 minutes with an electric mixer. This step is crucial because you're incorporating air that will make your gingerbread tender.
- Add moisture and richness:
- Beat in the egg and molasses until fully combined. The mixture might look slightly separated at first, but keep mixing until it comes together into a glossy, unified mass. You're building an emulsion here—patience pays off.
- Combine your spices:
- In a separate bowl, whisk together the flour, ginger, cinnamon, cloves, baking soda, and salt. This distributes the spices evenly so every piece of dough tastes consistently festive. Really take time with this whisking; there should be no clumpy pockets of spice hiding in your flour.
- Bring it together:
- Gradually add the dry ingredients to the wet mixture, stirring gently until a smooth dough forms. Don't overmix or you'll develop gluten and end up with tough gingerbread. Stop as soon as you see no streaks of flour.
- Chill and set the stage:
- Wrap your dough in plastic wrap and refrigerate for at least 30 minutes. This is when the flavors mellow and marry together, and the butter firms up so the dough rolls without sticking. I often chill mine for a full hour or even overnight—it's forgiving and actually improves with time.
- Heat your oven and prepare:
- Preheat to 180°C (350°F) and line a baking sheet with parchment paper. This temperature is gentle enough to bake the panels evenly without burning the edges before the centers set.
- Roll with intention:
- On a lightly floured surface, roll your chilled dough to about 5 mm thickness. Use a ruler if you like precision, or trust your eye. The thickness should be thin enough to bake through in 10-12 minutes but sturdy enough to support the house structure. Consider making a cardboard template for your house panels (front, back, sides, and roof pieces around 10-12 cm each) to ensure uniform sizing.
- Cut and arrange:
- Cut out your house panel shapes using the template or a sharp knife. Transfer them carefully to the parchment-lined sheet, leaving a little space between pieces. They won't expand much, but air circulation matters for even baking.
- Bake until just set:
- Bake for 10-12 minutes until the edges feel just firm but the centers still have a tiny bit of give. You want them crispy enough to support structure but not hard as rocks. The aroma will be intoxicating—that's your signal to watch closely toward the end.
- Cool completely:
- Transfer the panels to a wire rack. Patience here is rewarded; they firm up completely as they cool. Don't attempt assembly until they're absolutely room temperature and sturdy.
- Whip your royal icing:
- In a clean bowl, beat the egg white to soft peaks. Gradually add the sifted powdered sugar and lemon juice, beating continuously until you have thick, glossy icing that holds peaks. This will be your architectural mortar—the thicker and glossier it is, the better it binds and dries hard.
- Assemble with care:
- Use the royal icing like glue, applying it to the edges of your gingerbread panels. Press two pieces together gently and hold for a few seconds until the icing begins to set. Work on a flat surface. Some people support pieces with props (like rolled-up paper towels) while drying, and that's wise. Let the whole structure dry completely—at least 30 minutes, though I always prefer overnight for rock-solid stability.
- Decorate with joy:
- Once the frame is completely set, it's time for the fun part. Pipe royal icing along the seams and edges where you want candies to stick. Arrange your white chocolate drizzles, candies, sprinkles, and marshmallows, pressing each gently into the icing. This is where creativity flows; there's no wrong way to make it festive. Dust with edible glitter at the very end for a magical finish.
- Build your display:
- Once the frame is fully decorated and set, place it on a platter or cake board. Arrange additional cookies, roasted nuts, dried fruits, or holiday treats around and inside the frame to create a beautiful festive border. The frame becomes a natural centerpiece that holds treats and tells a story.
 Save
Save There's something sacred about that moment when you set the final piece of gingerbread and step back to see your house frame standing proud on the table, surrounded by treats and twinkling in the light. It transforms from an idea into reality, and suddenly your table isn't just set for dinner—it's a celebration of effort, tradition, and the magic of making something beautiful with your hands.
Building Your Gingerbread Frame Structure
The architecture of a gingerbread house frame is simpler than a full house, which is what makes it so elegant. You're creating essentially four walls and a peaked roof, all connected at edges and corners. The beauty lies in the fact that it doesn't need to be perfect; slightly wonky panels add charm and character. I've learned that thinking of it like puzzle pieces rather than precision engineering takes the pressure off and makes assembly more joyful. Start by laying out your pieces on the platter where the frame will live before you glue anything; this gives you a sense of the final space and lets you adjust placement for visual balance.
Flavor Variations and Personal Touches
While the classic version I've shared is timeless, I've experimented with countless variations depending on mood and season. Adding a tablespoon of cocoa powder to the dough deepens the brown color and adds subtle chocolate whispers without overpowering the spices. Some years I reduce the molasses slightly and add a touch of vanilla extract for a lighter interpretation. The decoration possibilities are truly endless—I've used crushed candy canes, dried cranberries, white chocolate shavings, and even tiny pretzels for a sweet-salty contrast. The key is letting your pantry and creativity guide you while keeping the beloved spice foundation intact. Trust your instincts and taste as you experiment; this recipe is forgiving and rewards bold choices.
Storage, Serving, and Make-Ahead Magic
One of the greatest gifts of this recipe is its flexibility with timing. You can bake the panels days ahead and store them in an airtight container at room temperature, which actually makes them easier to work with because they're bone-dry and sturdy. Assemble the frame the morning of your event, and it will be fully set and beautiful by evening. The gingerbread stays fresh and delicious for up to five days sitting on your table, making it the rare dessert centerpiece that improves with time. If you need to transport it, assemble on a sturdy cake board that can travel with it to avoid any tragic collapses mid-journey. And here's a secret: if a piece breaks during assembly, royal icing fixes almost everything—just apply generously and let it dry.
- Store baked panels in an airtight container for up to a week before assembly
- Royal icing dries hard and stable, so don't panic if it looks wet—let it cure fully before moving the frame
- The frame tastes delicious for days and becomes a talking point long after the meal ends
 Save
Save Making a gingerbread house frame isn't about perfection—it's about creating an edible artifact of celebration that brings people together. Every crack tells a story, every crooked candy adds character, and every crumb eaten tastes like tradition and love.
Recipe Questions & Answers
- → How do I ensure the house frame holds together well?
Use royal icing to securely glue the gingerbread panels, allowing ample drying time of at least 30 minutes for firm adhesion.
- → Can I prepare the dough in advance?
Yes, chilling the dough and baking panels a day ahead improves sturdiness and eases assembly on the following day.
- → What can I use to decorate the frame?
Decoration options include melted white chocolate drizzles, white and brown candies, sprinkles, and optional edible glitter for sparkle.
- → Is there a way to deepen the gingerbread color?
Adding cocoa powder to the dough mix enhances the brown tones for a richer appearance.
- → Are there allergen considerations to keep in mind?
This creation contains wheat, egg, and dairy; check all candies used for other potential allergens.